Saturday, April 30, 2011

Orange Breakfast Crescents


In honor of the Royal Wedding (After maintaining weeks of aloof disinterest, I finally got sucked in yesterday...), we had Orange Breakfast Crescents for a little light, late breakfast this morning.

These are light, airy, sweet, and delicately flavored with orange.  The perfect treat to take to brunch with the girls... or make for Mom on Mother's Day... or for your little girl's tea party.  Even my husband liked them!

And they're easy.  Have I mentioned that yet?  That's a prerequisite for any dish to make it to my "Breakfast Dishes I Might Actually Make" list.  See, I'm not a morning person, so I don't like to do much first thing in the morning.  I spread the cream cheese filling on the rolls and rolled them up the night before, so in the morning all I had to do was pop them in the oven and whip up the frosting.


Orange Breakfast Crescents
1 pkg 8-count refrigerated crescent rolls
3 oz cream cheese
3 Tbsp sugar
1 tsp grated orange zest
1/4 tsp almond extract
Preheat oven to 350.  Blend last four ingredients.  Separate rolls into their triangles.  Divide cream cheese mixture evently among triangles and spread, leaving a 1/4" border.  Roll each into a crescent, starting at the long edge.  Place on a baking sheet (lightly spray with cooking spray if it's not nonstick) and bake for 15 minutes or until browned.

Frosting:
1/2 c powdered sugar
1 Tbsp orange juice
1 tsp grated orange zest
1/8 tsp almond extract
Combine all frosting ingredients while rolls are baking.  Spread over hot crescent rolls as soon as you remove them from the oven.  Serve immediately.

Note: You can substitute vanilla extract if you don't have almond extract!

Wednesday, April 27, 2011

The Rare Pear


A good pear is hard to beat.  My parents get the Harry and David pears at Christmastime, and I adore and cherish those bites of melt-in-your-mouth peardom.  But rarely am I patient enough to buy those hard pears at the grocery store and then wait for them to ripen.  Sometimes, if I do actually buy them and put them in a dark corner of our cupboard to ripen, I forget about them and find them two weeks later at a stage way past ripe.

Not these pears.  I bought them.  I stored them.  They ripened.  I shared one slice with my dear hubby and then I ate the rest of them.  Better luck next time, baby.

Tuesday, April 26, 2011

Chocolate-Nut Cookie Pie

This pie is delicious served warm, with a glass of milk on the side.  It's got a slightly crispy top, a rich gooey center (no doubt courtesy of the butter), and a decadent layer of chocolate and nuts at the bottom.

And it's easy.

Reason enought to make it tonight, no?
 

Just in time for shorts and swimsuit season, from my kitchen to yours...

Chocolate-Nut Cookie Pie
2 eggs
1/2 c all-purpose flour
1/2 c sugar
1/2 c firmly packed brown sugar
1 c butter, melted and cooled to room temperature
1 c semi-sweet chocolate chips
1 c chopped walnuts and/or pecans
1 9" baked pie crust
Preheat oven to 325.  In a large bowl, beat eggs until foamy.  Add flour, sugar and brown sugar; beat until well blended.  Blend in melted butter.  Stir in chocolate chips and nuts.  Pour into pie shell.  Bake for 1 hour.

Monday, April 25, 2011

Falafel Pita Pockets

I love falafel.  Part of it is the name, I know it.  It's just so much fun to say.  Falafel.


We had them for dinner, with all the fixin's.  Tahini mixed with lemon juice and a little olive oil.  Homemade tzatziki.  Tomatoes and lettuce.  They were sublime.  When spring comes around, I gravitate toward these simpler, lighter meals.  And these falafel are baked, not fried!  I have to admit, their baked appearance made me a little nervous when I pulled them out of the oven.  But their texture is perfect.  Once you bite in, it's just creamy, well-spiced goodness.

Kudos to janecooks, the recipe-sharer at Tasty Kitchen!  Her falafel recipe will soon reside in my actual recipe box.

Sunday, April 24, 2011

Fire Pit Night


We lit a fire in our fire pit for the first time this spring tonight.  Lovely...  You have the best conversations when you're sitting in front of a fire.

Monday, April 18, 2011

Garlic Butter Soft Pretzel Bites


I made these Garlic Butter Soft Pretzel Bites on Saturday night, after a friend suggested the recipe as something that looked good.  Normally, I wouldn't have the patience for a recipe that calls for not just one, but two, dough risings.  But I had some time.  I love pretzels.  I took the plunge.

And it was worth it!  I would definitely make these again, probably for a crowd.  Just the two of us finished about half of the pretzel bites as we watched an old Office episode and chilled on the couch.  This is not a healthy pasttime, considering what the pretzel bites are drowned in.  Garlic butter.  They are drowned in garlic butter.  It's as dangerously addictive as it sounds.

Some of the bites turned out a little crispier on the outside and some stayed a bit softer.  We liked having the two versions to try.

Go here for Foodie with Family's recipe!  And don't compare the look of our pretzels, please and thank you.  Yes, hers look cuter and mine are more of the pretzel chunk variety!

Sunday, April 17, 2011

Simple, Basic Chicken Salad


Let me get something straight here.  This is a simple, basic chicken salad, but it is also still a delicious chicken salad!  Simplicity reigns in my lunch choices.

I'd suggest eating your chicken salad with other easy lunch foods - things you can grab out of the fridge and add to your plate easily.  I had deviled eggs on hand.  Add some sliced cheese.  An apple.  Some kettle chips.


Simple, Basic Chicken Salad
2 cans chunk chicken, drained
4 celery stalks, chopped
2 green onions, chopped
handful sliced almonds
handful red grapes, sliced in half
1 tsp dried oregano, approximately
1/2 to 3/4 c light mayonnaise, approximately
freshly ground black pepper, to taste

Put chicken into your mixing container.  Add chopped celery and green onions; mix.  Add mayonnaise and mix well.  Add oregano and almonds and your first grinding of black pepper; mix well.  Taste.  Add grapes and grind more pepper if needed; gently fold together.

Resist the urge to get too crazy with this.  Add an ingredient or two if you love them, sure, but remember, this is supposed to be simple goodness!

Saturday, April 16, 2011

Asparagus Tomato Scramble


I made a coconut cream pie earlier this week, so I had three egg whites sitting in my fridge.  They beckoned to me at lunchtime earlier this week.  I hate using only part of an egg and then forgetting the other part.  It is such a waste!

So I took those egg whites, added milk and a whole egg, chopped tomato, lightly boiled asparagus, and leftover feta cheese, and I made myself a tasty little scramble.  To serve it, I flopped a tortilla on top of the scramble while it was still in the skillet.  This warmed and softened the tortilla, and then I flipped the whole thing onto my plate.
 

It's not rocket science, but using up leftover ingredients is pretty darn satisfying.  Especially when they result in something this good for you!

Tangy Baked Beans

Picnicky barbecue outdoor food has to be one of my favorite cuisines.  The simple, utilitarian ingredients.  The easy, slow cooking methods.  The way people sit and talk when they eat ribs or corn on the cob or baked beans or coleslaw.  It's hard to be formal when the person across from you has sauce smeared across their chin or a smashed corn kernel stuck to the tip of their nose.

You can see how extensive my cuisine experience must be, to even list "picnicky barbecue outdoor" as a cuisine.  But anyhow.  This type of food done right, is more satisfying to me than almost any other.

I just thought of another vastly underrated cuisine.  Church potluck side dish.  I was at a church function Friday night and could have ignored the smoked pork butt completely, in favor of the delightful array of side dishes.  Potlucks are not for the weak of stomach or great of pessimistic imagination, of course.

I am really digressing.

I found this great baked bean recipe.  It calls for great northern beans rather than the typical melange.  Good stuff.  Tangy-sweet with an oniony edge.

Look at 'em.  And you don't have to smell up your house by frying bacon, either.  Chop a few hot dogs and you are set.


With no further ado, here is the recipe.

Tangy Baked Beans
3 cans great northern beans, drained and rinsed
4 all-beef, uncured hot dogs, sliced
1 1/2 c ketchup
1/2 c packed brown sugar
2 Tbsp molasses
1 medium onion, chopped
1/2 tsp ground mustard
1/4 tsp salt
1/4 tsp pepper
Combine all ingredients in an ungreased 2 or 2.5 quart baking dish.  Cover and bake at 350 for 1 to 1 1/2 hours or until heated through.  If you use the smaller dish, beware of the beans bubbling over!

Monday, April 11, 2011

Asparagus and Feta Frittata

I found this recipe in Taste of Home magazine a couple years ago, and it has endured in my kitchen ever since.  I even tracked it down online to make it tonight, after I lost my little magazine clipping.  So here it is, from my kitchen to yours...


You will serve this as a savory brunch when you have weekend guests.  You will serve this for a meat-free weeknight meal.  You will serve this when you have the girls over for a breakfast dinner.

Tonight we had it with cheddar garlic biscuits (Okay, I'll admit it...  They were from a package.  But they were amazing!) and a fruit salad.  The feta in the frittata is my favorite part.  That salty creaminess.  But then the asparagus is so good too.  Oh, just try it already!!
 

Directions

  • In a large skillet, cook asparagus in a small amount of water for 6-8 minutes or until crisp-tender; drain. Finely chop two spears; set remaining asparagus aside.
  • In an 8-in. ovenproof pan or skillet, saute the onions, garlic and chopped asparagus in oil until tender. In a bowl, whisk the eggs, cream, salt and pepper; pour into skillet. Cover and cook over medium heat for 3-5 minutes or until eggs are nearly set.
  • Arrange reserved asparagus spears so they resemble spokes of a wheel over eggs; sprinkle with feta cheese. Bake, uncovered, at 350° for 7-9 minutes or until eggs are completely set.
  • Yield: 2 servings.
Note from Dangerously Domestic:  I don't know how the recipe creator fits ten asparagus spears in an 8" skillet.  You can see I had no luck with my wheel-spoke arrangement.  I actually chopped three spears of asparagus and trimmed all the remaining spears down so they'd fit in a row.
 
Nutrition Facts: 1/2 frittata equals 427 calories, 32 g fat (12 g saturated fat), 670 mg cholesterol, 500 mg sodium, 8 g carbohydrate, 3 g fiber, 27 g protein.


Asparagus and Feta Frittata

  • 12 fresh asparagus spears, trimmed
  • 2 green onions, chopped
  • 1 garlic clove, minced
  • 1 tablespoon olive oil
  • 6 eggs
  • 2 tablespoons heavy whipping cream
  • Dash salt and pepper
  • 1/2 cup crumbled feta cheese

Saturday, April 9, 2011

Bean and Barley Salad

This, my friends, could very well be the perfect spring dish.


Serve it as a side dish.

Scoop it on top of a fresh green salad topped with shredded cheddar.

Serve it as a light main dish, with tortilla chips for scooping.

Stuff it inside tortillas for a meatless burrito.  Or add shredded chicken to it and then stuff it inside tortillas.

Stuff it inside pita pockets with lettuce and feta cheese.

The serving variations for this dish are practically endless, and it's so easy and inexpensive to make.  The barley and beans are a terrific combination of whole grains, fiber, and protein.  Add the olive oil in the dressing (good fat) and we've got a winner.

Another plus for this recipe is the number of ways you can make it your own.  You could add sliced black olives, cheese, tortilla strips.  You could mix up the flavors to give it a more Mediterranean or Asian flair.

Bean and Barley Salad
3/4 cup barley
1 can light red kidney beans, drained and rinsed
1 can black beans, drained and rinsed
1 can whole kernel corn, drained
1 red pepper, finely chopped
6 green onions, chopped
1/3 cup cilantro, chopped
Mix all ingredients together in a large bowl.
Dressing:
3/4 cup olive oil
1/3 cup red wine vinegar
2 garlic cloves, finely minced
1 1/2 tsp chili powder
3/4 tsp cumin
3/4 tsp salt
1/4 tsp black pepper
1/4 to 1/2 tsp crushed red pepper flakes
Whisk dressing ingredients together in a small bowl and pour over barley and bean mixture.  Chill, covered, until ready to serve.

Friday, April 8, 2011

Flat Out: My Alternative to Two Traditional Slices

I have eaten a flatbread turkey and cheddar sandwich three times in the last two days.  It's that satisfying.  Well, that, and it's part of my grocery budget plan.  Eat something until it is g-o-n-e.  No waste.


I discovered these flatbreads on the bottom shelf of Walmart's gigantic bread aisle, and they really spoke to me for several reasons.
1. multi-grain
2. flax seeds
3. 1 gram of sugar

They were about $2.50 for a bag of 6, so I decided to give them a shot.  Sometimes I get tired of sticking my sandwich "fixins" between two pieces of regular ol' bread.  Especially if I had a slice of bread with my breakfast oatmeal, as I very often do (It's a good scooper; if you're an oatmeal eater, you can appreciate this.  Too many mouthfuls of the same consistency can get a little tiresome.).

I spread this light little flat bread (100 calories and 2.5 grams of fat) with some light Hellman's and some dijon mustard, then piled on my sharp cheddar, oven roasted turkey, and lettuce.  Delightful.  It makes me believe spring is really, truly here, when my body actually craves a light lunch like this!

Wednesday, April 6, 2011

My Weekend in Hard Labor

This past weekend, I worked harder than I have worked in a long time.  I got dirt under all ten of my fingernails, around my ankles, in my lip creases, in my elbow creases, and probably on the back of my neck.  I forgot to check there.  At that point in my dirt cataloguing, I was just so exhausted I fell asleep.

Why?  Why was I so exhausted?

Because, my friends, I was helping my family plant 500 shrubs and then lay weed barrier over them and then cut little peepholes so those 500 little stick-like shrubs could actually see the light of day and GROW.  All in
tempestuous early spring Kansas weather.  We had a rain delay one day and disgustingly high winds the next.

But, like so many things done with family, it ended up being a pretty great time.  Memories and stories from our two days of planting will resurface around the dining room table for years to come.

I've never planted 500 of anything before.  I'm guessing most of you haven't either.  So let me walk you through this.  It's more interesting than botany class, I promise.

You start with the field in which you want to plant your shrubs.  You measure the area.  You burn the grass if necessary, so you can till the dirt so it isn't baked into a rock-hard surface.  Because, to have a chance at growing success, you have to be able to get the shrub in the dirt, after all!

This is what tilled land looks like.  This is on Day 1, after our late start because of a rain delay.  Mom and Dad had already prepped the land.


Next you need a method.  For us, it was two men ("dibblers") with "dibbles" followed by two women with 5 gallon buckets full of water and shrubs.  You have to keep the shrubs' delicate, rather new little roots in water so they don't dry out before they are safe in the dirt.  The buckets are heavy, very heavy.

The dibble is the orange lever-like thing pictured below.  The top is the handle you hold onto while you use your foot to shove the dibble into the ground; then you rock it back and forth until you have a V-shaped hole just right for inserting a stick-like shrub.  This is why you want the ground to be worked up.


The dibbler isn't the only person with an important job, though!  Oh, no.  The planter is obviously a key part in this.  As a planter, you have to make sure that the roots are all down in the hole, not sticking up at all (easier said than done for the shrub with twelve inches of roots).  Then you have to carefully pile dirt back around the shrub, making sure the shrub is upright so it will grow straight.  Then you stand and use your feet to stomp the ground down compactly around the shrub.  Spread a little more loose dirt around, and you're on to the next one.


Just for reference, it took us about 1 minute from start to finish, to plant each shrub.


Can you believe how small these things are?  Fortunately, they're fast-growing!

Day 2 was spent running weed barrier over our newly planted little shrubs.  The weed barrier, as you might guess from its name, keeps weeds from sprouting up, around and over these new shrubs.  Weeds sometimes seem much stronger than the "good" plants, so this is an efficient way to reduce weeds without spending days on end weeding by hand.  You couldn't pay me to do that, family or not!

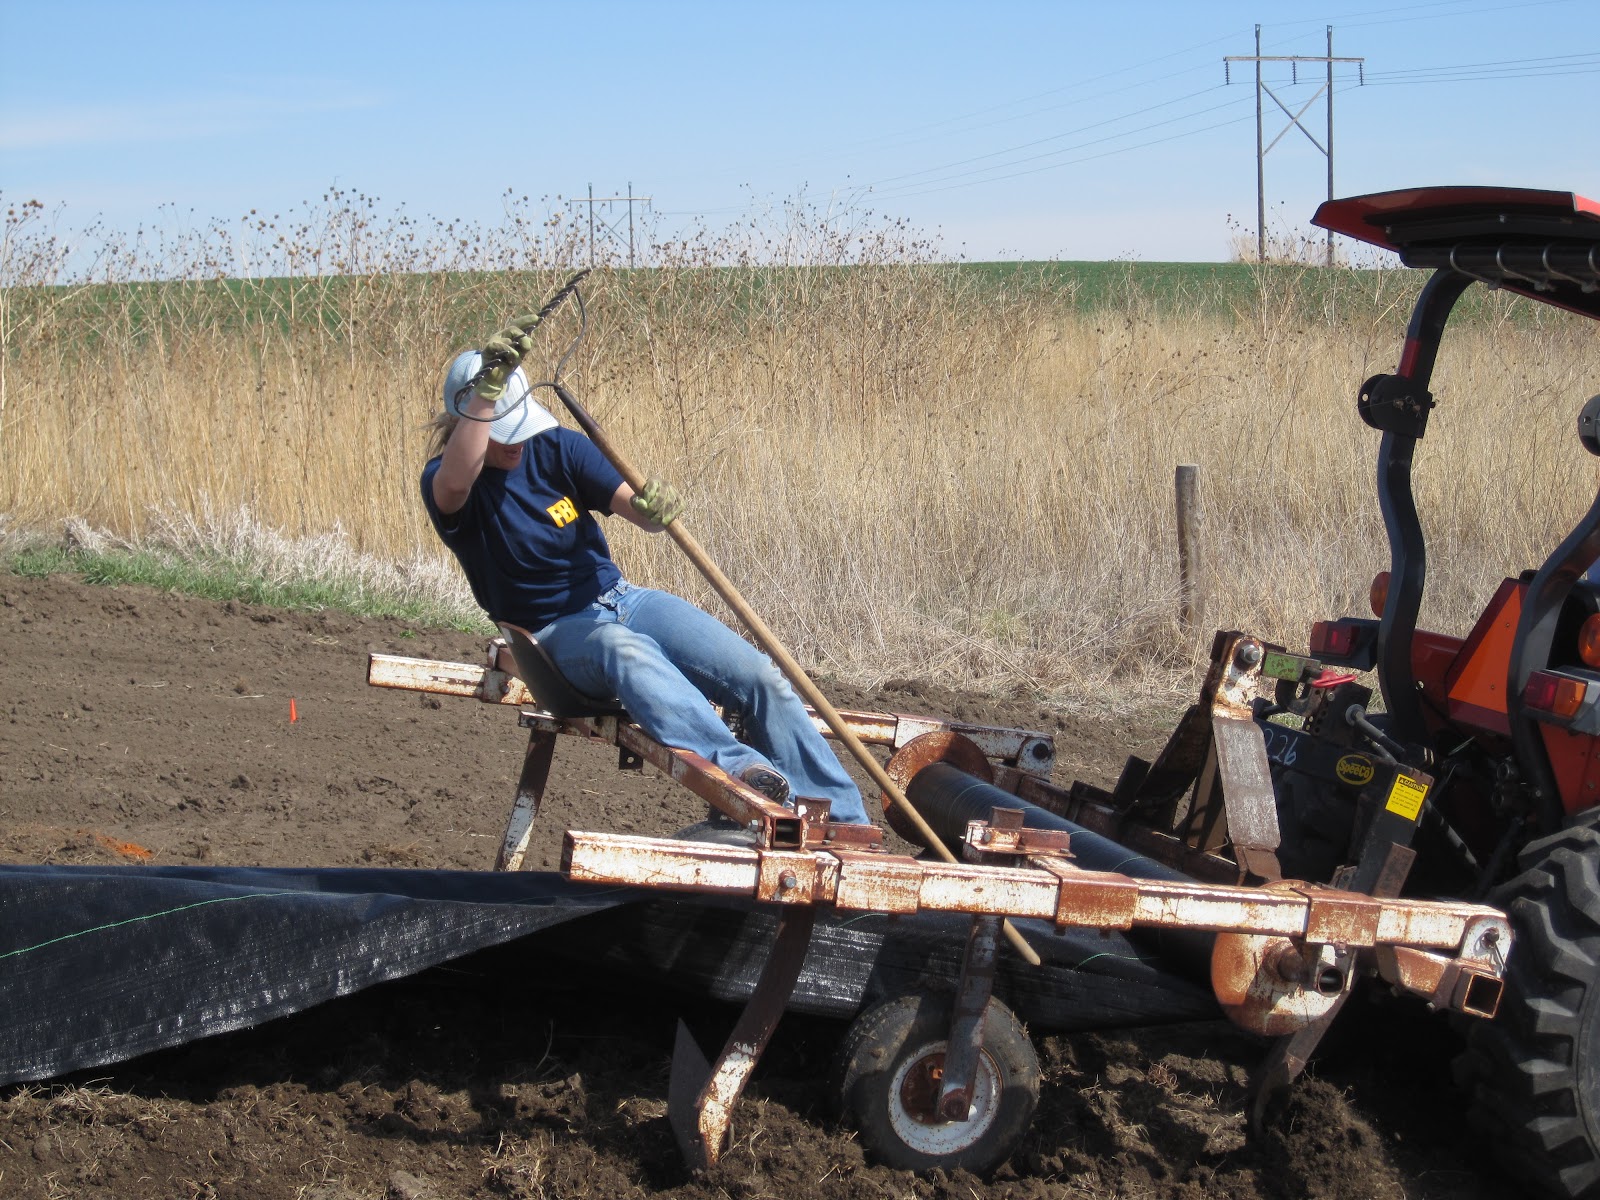
We used this ancient-looking contraption.

You can't tell from the picture above, but there's a seat in the middle.  Does that seem dangerous?  I imagine it kind of is.  Yet it was one of the more coveted jobs, I think.  Because you got to sit.


What I'm doing with the rake is trying to keep the weed barrier flat to the ground.  The tires are supposed to run over it and the blades behind the tires are supposed to pile the nicely-tilled dirt up on top of the weed barrier to keep it in place.  That's how it works when all is right with the world.  When the wind isn't gusting ninety miles an hour.  Obviously it's gotten a little out of hand here.


Below is a picture of Kaley getting instructions for her role as Shrub Peephole Creator.  See all those bumps in the weed barrier?  Those are the shrubs, spaced (approximately) 6 feet apart.  Her job was to crawl along, find the root of the shrub, cut a hole and pull the shrub through.  Not as simple as it sounds, really.  A lot of times, when all you're feeling is a bump in the barrier, you can't tell if it's the top or the bottom of the shrub!


And at the end of Day 2, after working through the most clod-filled patch of land we had, we were able to pull it together for a final group shot and a smile.  Because now we get to ride around in the Kubota and survey the little domain that we've just made a bit more wildlife-habitable.

Side note.  The sandwiches and chips we had were some of the best we'd ever had.  We decided food tastes better when eaten outside with dirty hands.

And thus ends this little diatribe on hard labor and extreme planting.

Tuesday, April 5, 2011

Dilly Onion Bread

Doesn't it just sound springy?  Dilly Onion Bread.  It's sweet without being sickeningly so and oniony without making you worry about your breath.  And the butter makes it oh-so-moist.  A delicate bread, but so easy to make.  No yeast, no rising, no kneading.  My kind of bread!


Had I done a better, more uniform job of cutting in my butter, I think my bread would be less likely to fall apart.  Ah, the perils of baking without a pastry cutter.


You could deliver one of these cute little loaves to a friend with a packet of flower seeds and the recipe card.  Or a bunch of daffodils.

Dilly Onion Bread
2 c all-purpose flour
1 c whole wheat flour
1/2 c plus 2 Tbsp sugar
1 1/2 Tbsp baking powder
2/3 c unsalted butter
1 c milk
4 eggs
2 tsp dried minced onion
5 tsp dill seed

In a large bowl, combine the flours, sugar and baking powder; mix well.  Cut in the butter.  In another bowl, blend together the milk, eggs, dried onion and dill seed.  Pour into the flour mixture and stir until well combined.
Pour into 4 6" foil loaf pans coated with cooking spray.  Bake at 350 for 30 minutes or until a knife inserted in the middle comes out clean.

Monday, April 4, 2011

The Perfect Orange Julius


This orange julius is balm to my sneezy, runny-nosed, bleary-eyed existence.  It is smooth, sweet, refreshing.  Thick enough you can eat it with a spoon, but not so thick that you can't sip it if you'd prefer.  I'm doing a little of both.

And I'm already feeling better.

It's got to be this orange julius.

Or maybe it's the loratadine and the two acetaminophen I took, finally kicking in.

The Perfect Orange Julius
6 oz. frozen orange juice concentrate
1 c milk
1 c water
1/2 c sugar
1 tsp vanilla (the good kind, the Mexican kind, preferably the kind that comes in the bottle with the red rooster)*
20 ice cubes
Put all your ingredients in a blender, except the ice cubes.  Add 10 of the ice cubes and blend until smooth.  Your drink will start to get frothy.  Toss in your 10 remaining ice cubes and blend until smooth.  Taste for texture; if you like it, serve immediately.  If you want it a little icier, add more ice.

Disclosure:  This makes a full blender, so you better either be really sick or willing to share.  Or you could freeze the leftover and then scoop it into a fizzy lemon-lime soda.

*This is the really good vanilla.  It smells so pure, so truly vanilla-y, that you'll want to drink it straight from the bottle.  But if you take even a little sip, you will change your mind.  However, this vanilla will change your life - or at least your baking.